About Me
- Country Princess
- Hi. My name is Kim and I have four kids. I am married and have been for 16 years. I have been doing tutorials since 2012 and I now also make kits and have been doing so for about 5 years now. Some of the tutorials I make will be with the kits I make. Some will be PTU and some will be FTU.
My Free Copyright

My Avatars

Saturday, January 14, 2012
Love is in the Air

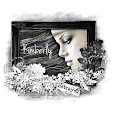
Love Is In the Air
Supplies
Scrapkit used: I am using a PTU kit called Love is in the air and you can get here:
I am using a mask from WSL and it is WSL_Mask194. You can get it here:
The Tube I am using is a PTU one from PTE and you need a license to use their tubes. The tube I am using is called Kimberly from Gothique Starr. You can find this tube and all her other tubes here:
Let’s get started!!!
Open a new canvas sized 650x650 with a white background
Open the element called Branch-C/P-Place it at the top of your canvas-Duplicate it-Flip it-Merge them together-Add a drop shadow to it
Open your tube-If you are using the one I am C/P-Then resize it by 90%- and place it like I have mine-Add a drop shadow to it-If you are using a different tube then C/P and resize it to your like and place it as you would like
Highlight the background layer-Open paper #11-C/P-Resize the paper by 90%-3x’s-Apply mask-Merge group
Highlight raster layer 1-Open the element called Curtain-C/P-Resize it by 80%-Place it on the left side of the canvas like I have mine-Duplicate it-Mirror it-Merge them together-Add a drop shadow to it
Highlight raster layer 3-Open the element called Cherry-C/P-Resize it by 80%-2x’s-Using your deform tool turn it a bit to the left-Place it like I have mine-Duplicate it-Mirror it-Merge them together-Add a drop shadow to it
Highlight the top layer in the layer box-Open the element called Chocolates-C/P-Resize it by 50%-Place it like I have mine-Add a drop shadow to it
Highlight the top layer in the layer box-Open the element called Loving Tea-Resize it by 50%-Place it like I have mine-Add a drop shadow to it
Highlight raster layer 4-Open the element called Sparkle1-C/P-Place it at the top of the canvas like mine-Duplicate it-Merge them together-Duplicate it again-Flip it-Merge them together
Now just add your name and copyright info
Good luck and have fun!!!

Subscribe to:
Post Comments (Atom)
My Blinkie

I CT for

Blogs I Like


Blinkies


0 comments:
Post a Comment