About Me
- Country Princess
- Hi. My name is Kim and I have four kids. I am married and have been for 16 years. I have been doing tutorials since 2012 and I now also make kits and have been doing so for about 5 years now. Some of the tutorials I make will be with the kits I make. Some will be PTU and some will be FTU.
My Free Copyright

My Avatars

Sunday, September 23, 2012
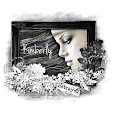
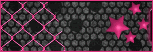
Blood Red

Supplies Needed
Scrapkit-I am using my own PTU kit called Blood Red and you can find it here
Tube-I am using a PTU
tube called Holiday Stalker by Rac and you can get it here
Template-I am using
template # from Pooker and you can find it here
Mask of Choice
Font of Choice
Let’s get started!!!
Delete the copyright
info
Highlight raster
1-Floodfill it white-Make it invisible
Highlight the Black
Square layer-Click on it withy our magic wand tool-Modify-Expand by-Highlight
the White Square layer-Delete-Select None-Delete the Black Square layer-Delete
the White Dotted Layer as well as the Red and Gray Circles layers as well as
the white circle and red square layers
Now use these papers
for these layers
Black Circle-pp# 10
White Square-pp#
17-Click inside this layer-Modify-Expand by 5-Highlight raster 2-Open paper
#28-C/P-Invert-Delete-Select None
Highlight raster
6-Open your tube-C/P-Place like mine-Erase the part of her legs that are
hanging out of the bottom of the frame-Highlight raster 5-Duplicate it-Move the
original layer below the tube layer-Highlight the duplicated layer again and
erase the top parts so it looks like mine-Erase the black dots that are over
the tubes face-Drop shadow the tube layer
Highlight raster
1-Make it active again-Apply mask-Merge group
Highlight raster 6-Open
element #62-C/P-Resize by 80%-Place it like mine-Drop Shadow it
Highlight raster
5-Open element #29-C/P-Mirror it-Resize it by 50%-Place it like mine-highlight
the duplicated frame layer that is above the tube layer-Erase parts of the
frame so that raster 9 is showing through like mine is-Duplicate raster
9-Mirror it and do the same thing on the other side of the frame layer as you
just did-Merge raster 9 and its duplicated layer together
Highlight the top
layer-Open element #3-C/P-Resize it by 70%-Place it on the left side of the
canvas like mine-Duplicate it-Mirror it-Merge them together
Highlight the Black
Dotted layer-Open element #76-C/P-Resize it by 60%-Place it like mine-Drop
shadow it
Highlight the top
layer-Open element #64-C/P-Resize it by 40%-Rotate it a bit to the left like
mine-Place it like mine-Drop shadow it-Duplicate it-Mirror it-Merge them
together
Highlight raster
3-Open element #21-C/P-Resize it by 45%-Place it like mine-Drop shadow
it-Duplicate it-Mirror it-Merge them together
Highlight the top
layer-Open element #12-C/P-Resize it by 35%-Rotate it a bit to the right so it
looks like mine-Drop shadow it
Highlight top
layer-Open element #14-C/P-Resize it by 50%-Place it like mine-Drop shadow it
Highlight the top
layer-Open element #15-C/P-Resize it by 30%-Place like mine-Drop shadow it
Highlight raster
13-Open element #16-C/P-Resize it by 40%-Place like mine-Drop shadow it
Now just add your
name and copyright
Subscribe to:
Post Comments (Atom)
My Blinkie
I CT for

Blogs I Like


Blinkies


0 comments:
Post a Comment