About Me
- Country Princess
- Hi. My name is Kim and I have four kids. I am married and have been for 16 years. I have been doing tutorials since 2012 and I now also make kits and have been doing so for about 5 years now. Some of the tutorials I make will be with the kits I make. Some will be PTU and some will be FTU.
My Free Copyright

My Avatars

Tuesday, February 28, 2012
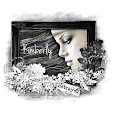
I'm Not Your Type...I'm Not Inflatable

I'm Not Your Type...I'm Not Inflatable
Supplies Needed
The scrapkit that I am using is called Blackcurrant and it is a PTU kit which you can get here
Tube used is a PTU one called Marie by Lady Mishka and you can get it here
I am using template number 62 from Deb and you can get it here
Mask of Choice
Font of Choice
Plugins Needed: Penta.com
Let’s get started!!!!
Open your template-Delete the copyright info and raster layer 5
Make raster layer 1 active-Go to Image-Canvas Size and resize it by 650x650-Flood fill it with white
Highlight raster layer 2-Click on it with your magic wand tool-Open paper #8-C/P-Resize it by 80%-2x’s-Invert-Delete-Select None-Delete the original layer-Open your tube-C/P-Resize it by 40%--Mirror-Highlight raster layer 10-Click on it with your magic wand tool-Invert-Go back to your tube layer-Hit delete-Select None-Change the blend mode to Luminace(Legacy)-Merge them together
Highlight Copy of Vector 1 layer-Select All-Float-Defloat-Open pp#4-C/P-Resize it by 80%-2x’s-Invert-Delete-Select None-Delete original layer-Add a drop shadow to it
Highlight raster layer 4-Click on it with magic wand tool-Open pp#1-C/P-Resize it by 70%-Invert-Delete-Delete the original layer-Add drop shadow
Highlight raster layer 3-Flood fill it with this color #9e3ef8-Use the pluin called Penta.com-Dot and Cross and use the default settings-Click ok-Add a drop shadow
Highlight Copy of Vector 1(Pink Rectangle)-Flood fill it with this color #57099f-Use the Dot and Cross plugin again with the same settings-Add a drop shadow
Highlight raster layer 1_open pp#6-C/P-Apply Mask-Merge Group
Highlight top layer-Open your tube-C/P-Resize it by 45%-Place it like mine-Add a drop shadow to it
Highlight top layer-Open element #121-C/P-Resize it by 40%-Place it like mine-Add a drop shadow to it
Highlight the tube layer-Open element #11-C/P-Resize it by 50%-Place it like mine-Add a drop shadow to it
Highlight raster layer 8-Open element #4-C/P-Place it like mine-Add a drop shadow
Highlight top layer-Open element #92-C/P-Resize it by 30%-Place it like mine-Add a drop shadow to it
Highlight top layer-Open element #97-C/P-Resize it by 50%-Place it like mine-Add a drop shadow to it
Highlight top layer-Open element #101-C/P-Resize it by 40%-Mirror-Rotate it to the left a bit-Add a drop shadow to it
Now just add the copyright info and name as well as your license number
Subscribe to:
Post Comments (Atom)
My Blinkie

I CT for

Blogs I Like


Blinkies


0 comments:
Post a Comment